
When deploying penetration testing toolsets, analyzing malware behavior, or simply trying to route telemetry through restricted networks, corporate firewalls and ISP-level Deep Packet Inspection (DPI) present a massive roadblock. Standard VPN tunnels hide your destination IP address and encrypt payload contents, but they fail to conceal the underlying protocol signature itself.
Standard OpenVPN or WireGuard handshakes leave distinct mathematical fingerprints. Modern Next-Generation Firewalls (NGFWs) such as Palo Alto, Fortinet, or SonicWall inspect packet metadata in real time, flag the VPN signatures, and terminate the connection within seconds—even if they cannot read the encrypted payload inside.
During our hands-on testing across restricted network environments, bypassing aggressive DPI filtering required moving beyond standard client-side VPN routing. If you are routing virtualized guest machines through this encrypted tunnel, make sure to follow our step-by-step guide on configuring your VirtualBox NordVPN setup correctly to enforce host-level kill switches. In this technical guide, we will break down how DPI protocol identification works, compare manual stealth encapsulation frameworks against ready-to-use obfuscation layers, and walk through configuring a fail-safe obfuscated environment step by step.
What Makes Standard VPN Traffic So Easy for DPI to Block?
To defeat packet inspection, you must understand how edge firewalls identify active tunnels. Standard network encryption relies on known headers and fixed port assignments that stand out to packet inspection engines.
Deep Packet Inspection relies on three primary detection mechanics:
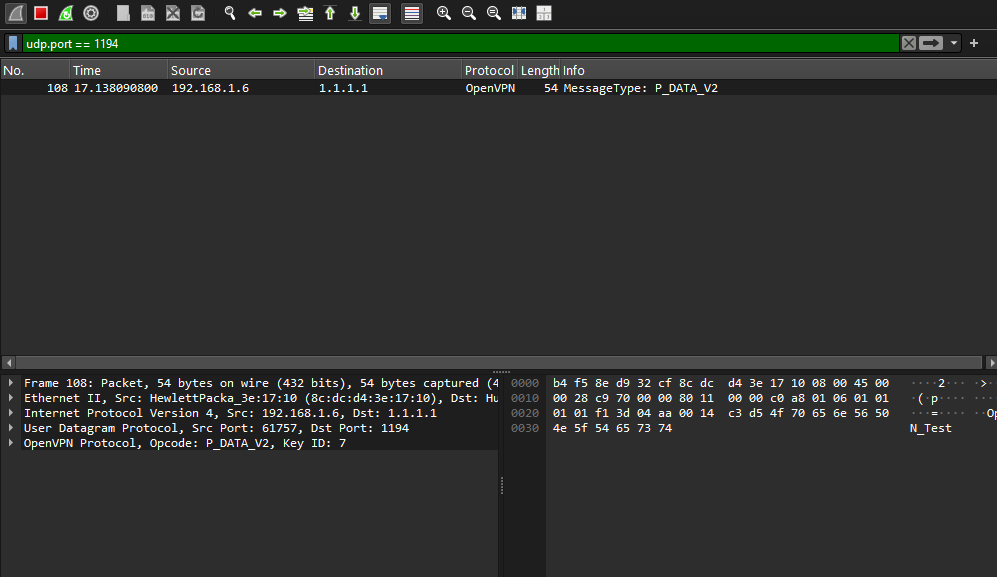
Fixed Port Signatures: Standard OpenVPN defaults to UDP port 1194, while WireGuard operates on UDP port 51820. Firewalls instantly drop traffic bound for non-standard ports or block known default endpoints completely.
Handshake Metadata Analysis: Before encryption keys are exchanged, protocols transmit cleartext negotiation parameters. DPI engines identify these exact byte sequences (TLS Client Hello signatures) and apply instant drops.
Traffic Flow Analytics (Entropy Scanning): Encrypted data streams exhibit high randomness (entropy) compared to normal HTTP/S web browsing. When a firewall sees high-entropy UDP streams running continuously to an unclassified IP, automated heuristics flag and isolate the host.
Technical Comparison: Stealth Protocols vs. VPN Obfuscation
Bypassing advanced Deep Packet Inspection (DPI) engines requires more than standard data encryption; it demands complete protocol masking. While standard VPN tunnels conceal your traffic contents, stealth protocols and VPN obfuscation wrappers strip away identifiable mathematical fingerprints (such as TLS Client Hello signatures and standard port assignments), transforming your packets so they mimic legitimate, unflagged HTTPS web traffic (TLS over TCP port 443).
Below is a detailed technical evaluation comparing manual encapsulation methods, custom proxies, and automated obfuscation layers across setup complexity, throughput performance, and DPI bypass reliability:
For a complete comparative breakdown of providers supporting dedicated obfuscation features, review our evaluation of the 5 Best Paid VPNs for Ethical Hacking & Anonymity in 2026.
Step 1: Analyzing the Firewall Rule Base Before Bypassing
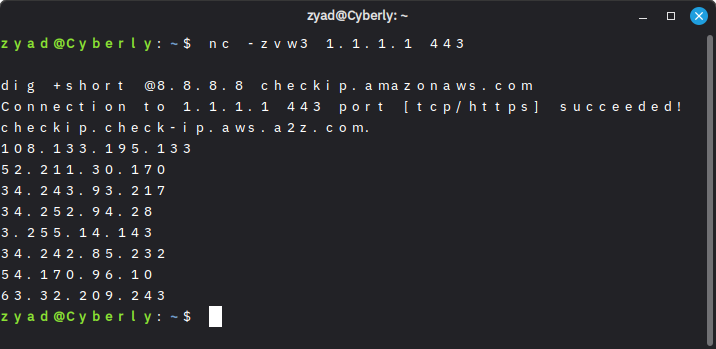
Before bypassing external DPI networks, ensure your local sandbox environment is hardened by reviewing How to Safely Isolate VirtualBox VM from the Host Once isolated, never launch an obfuscated connection blindly without inspecting your egress network conditions. Run these quick reconnaissance commands from your primary terminal:
Verify Unrestricted Egress Ports: Check if standard HTTPS outbound ports are open by querying public resolvers over TCP port 443:
Inspect DNS Redirection: Ensure local network firewalls are not intercepting and rewriting your DNS requests:
Step 2: Deploying Obfuscation via NordVPN GUI & CLI
Configuring custom SOCKS5 proxies or manual OpenVPN tls-auth wrappers introduces significant packet overhead and maintenance headaches. Utilizing pre-configured obfuscation servers strips the protocol metadata automatically while maintaining high-throughput routing.
Configuring Obfuscation on the Desktop App
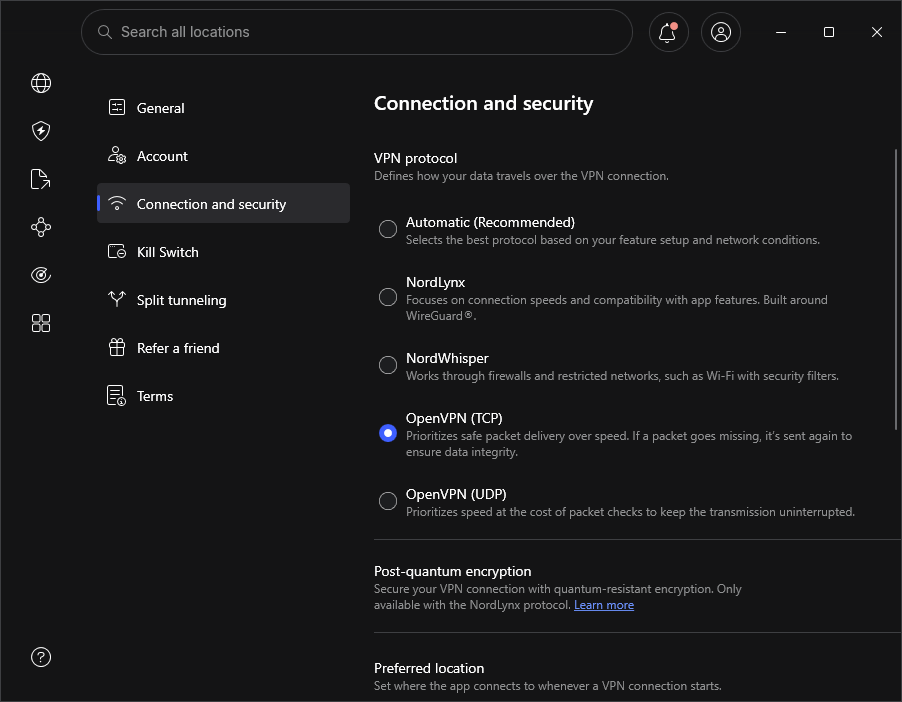
Open your VPN client settings and navigate to Connection Settings.
Change the protocol explicitly to OpenVPN (TCP). Note: UDP protocols cannot be obfuscated cleanly over port 443.
Toggle the Obfuscated Servers switch to enabled.
Return to the main menu and connect to a dedicated Obfuscated specialty server node.
Configuring Obfuscation via Linux CLI (Pentesting Host)
If you are operating inside a headless Kali Linux or Ubuntu environment, execute the following configuration sequence:
Step 3: Verifying Zero-DPI Leaks & Connection Entropy
Once connected, you must verify that your outbound packets no longer display signature banners that trigger active firewall drops.
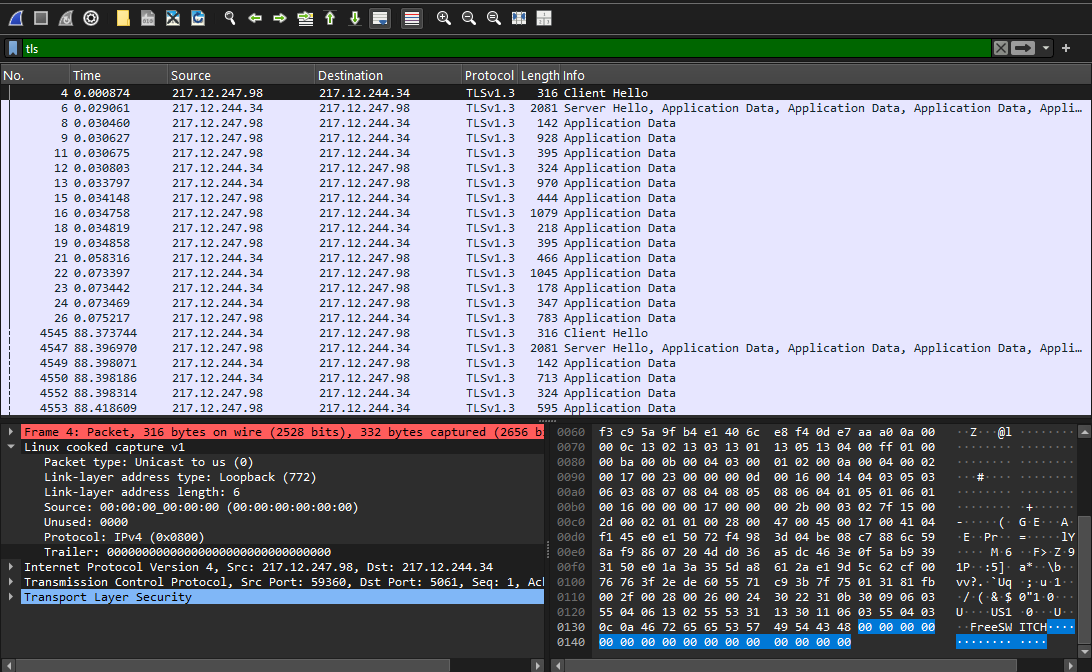
1. Packet Structure Verification: Open Wireshark on your host interface and filter by your active VPN destination IP:
2. Inspect Protocol Column: Verify that Wireshark classifies the payload strictly as TLSv1.3 or Application Data without displaying underlying OpenVPN protocol banners.
3. Run an Extended Leak Test: Ensure no raw guest frames bypass the tunnel by checking DNS/WebRTC queries at dnsleaktest.com.
Summary & Best Practices
Bypassing network firewalls and Deep Packet Inspection requires removing the identifiable signatures of your VPN traffic. Switching to OpenVPN over TCP port 443 combined with dedicated obfuscation layers ensures your data packets blend seamlessly into standard HTTPS web traffic.
Always verify your egress packet stream using Wireshark before executing active security tasks, maintain strict host-level kill switches, and ensure your local DNS queries do not escape outside the obfuscated tunnel.
❓ Frequently Asked Questions (FAQ)
Does using VPN obfuscation slow down network connections?
Yes. Wrapping VPN packets inside additional TLS/HTTPS headers introduces minor bandwidth and CPU overhead. However, running OpenVPN over TCP port 443 with dedicated obfuscation servers maintains high-throughput stability sufficient for active scanning, proxying, and streaming without triggering firewall throttling.
Can Deep Packet Inspection detect Obfuscated VPN traffic?
While DPI cannot read encrypted payloads or identify the underlying OpenVPN protocol signature, ultra-advanced firewall engines (like Palo Alto NGFWs) may use statistical flow analysis (timing and entropy heuristics). However, combining OpenVPN TCP 443 obfuscation with randomized packet timing makes detection virtually impossible for standard corporate or ISP firewalls.
Is OpenVPN TCP better than UDP for bypassing firewalls?
Yes. UDP traffic is often monitored or throttled aggressively on restricted networks because standard web browsing relies on TCP. Routing OpenVPN over TCP port 443 mimics legitimate HTTPS traffic, making it significantly harder for firewall rule bases to block without disrupting normal web access.